Create a new collection database, with data, from a comma-separated-values (CSV) text file
If you already have data about your collection in a spreadsheet or simple database product, you can transfer this collection data to Recollector in a single step, which both defines the fields for your collection and imports your existing data into the new collection database. Recollector uses comma-separated-values (CSV) files as the data format for importing collection data.
Note: If you have your data in an Excel spreadsheet on the Mac, you can use Recollector's ability to import directly from Excel, without having to create a CSV file. See the help on creating a new collection from Excel.
Almost all spreadsheet and database products let you write out a particular set of data (a sheet of a spreadsheet or a table from a database) as a CSV file. Please consult the help of your spreadsheet or database software to learn how to generate a CSV file. The help in this section assumes that you have already created the CSV file from your data.
General information about the CSV format is readily available on the internet (for example: see the Wikipedia page on Comma-separated values).
Important note: The first line of the CSV file must contain the names for the fields. Recollector uses this first line to supply field names for the collection database. If your CSV file does not have a first line with field names, edit the CSV file and insert an initial line with comma-separated (or tab-separated, if your CSV files uses tab characters as the separator) names for the fields.
Note: Despite the name comma-separated, CSV files can use characters other than commas to separate field values. Recollector supports CSV files that use either commas or tab characters as the field separator.
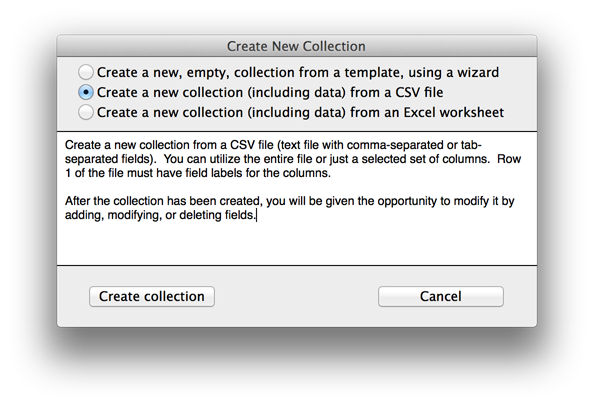
To make a collection from a CSV file, use Recollector's menu and choose File > New Collection. In the Create New Collection window that comes up, select Create a new collection (including data) from a CSV file, and click the Create collection button.
| View the Create New Collection dialog ... |
You will next be prompted to select the CSV file. After selecting the file, you will be asked whether the CSV file should be converted from Windows format. If the CSV file was generated on a PC running a version of MS/Windows, request that it be converted; if the CSV file ws generated on a Macinstosh computer, do not request conversion. (Conversion involves translating the codes for special characters, such as accented letters, from the Windows coding to the corresponding Macintosh [unicode] coding. Do not request conversion for a CSV file produced on a Mac.)
Recollector next presents the Import New Collection dialog. This dialog lets you specify the name for your collection, and it lets you modify the set of fields that will be included. For each field:
- Choose whether to include the field as part of the collection. Turn off the check-box for any field that you do not want to include.
- Adjust the choice of data-type. Recollector makes a best-guess choice of data-type, based on the kind of data in the field, but you may want to override these choices. As an aid to deciding on the proper data type, use the preview data button to display the first four data values found in the CSV file for the given field
| About field data types ... |
The Import New Collection Dialog also lets you define the ID # field for your collection. This is the field that allows you to create hyperlinks between different records in the collection.
| About the ID # field ... |
| View the Import New Collection dialog ... |

When you have finished making adjustments on the Import New Collection dialog, click OK, and Recollector will prompt you for the name and location of the collection file. Every collection is saved as a single file in XML format, with a filename extension .xml. (The only parts of your collection database that are stored outside of the XML collection file are the images, as well as any audio or video clips. These external image and media files are referenced from within the collection file.) You can place your collection file wherever you want on your hard disk.
Recollector creates your collection and imports the data, and a window is opened displaying the new collection.
| View the new collection window ... |
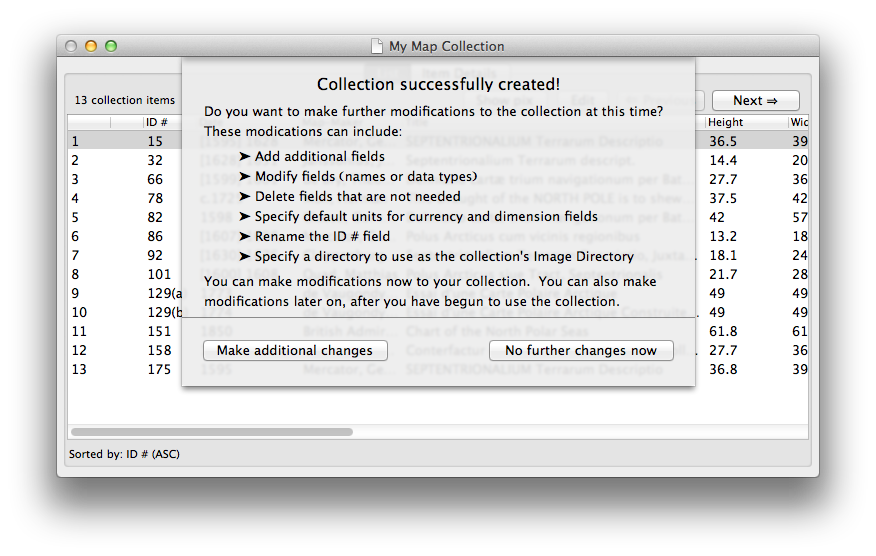
Though the collection has been successfully created and a new collection window opened, you may want to make adjustments to your collection. As can be seen from the image, above, of the new collection window, a list is given of changes that you might want to make to your collection. You can either make changes now, or make them later (using the Edit > Modify Fields or Image Directory menu item) after you have spent some time working with your new collection.
If you decide to make additional changes now, clicking on the Make additional changes button will take you to the Modify Fields and Image Directory dialog. See Modify fields for a description of how to use this dialog to make changes to the design of your collection.
Related topics:
Create a collection from a template.
Create a collection from an Excel spreadsheet.