Generating a web site
Recollector can generate a web site that documents your collection. The generated web site consists of one page for each of the items in the collection, as well as an index page that provides links to each of the individual pages. The per-item web pages have an appearance similar to the Item Details view of an item within Recollector. Hyperlinks, including jump-to links, information links and web links are all included within the web pages. Images are shown as thumbnails which, themselves, are clickable links to full-resolution images.
The primary purpose of generating a web site is to share information about your collection, by placing it on a web server where it can be accessed by anyone to whom you give the web site's address. Recollector does not provide the web server hosting; it only generates the HTML files that comprise the site's web pages. It is up to the user to have an account on a web server and to upload the generated files to that server.
You may not want to share all of the information about your collection on a web site. You might, for example, not want to share pricing information. Or you may want to include only a subset of the items in your collection at the web site. Recollector allows you to make these restrictions, by limiting the fields that are included or by generating pages only for records within a particular subset.
The web pages generated by Recollector can be further customized, if you desire. In particular, header and footer placeholders are generated as separate files (header.js and footer.js) and you can edit these to include javascript that will display custom headers and/or footers on all your pages, since all of the generated pages include these custom header and footer files. If you generate PHP files, there are also placeholders for PHP code to produce custom headers (header.php) and/or footers (footer.php) using PHP code. See the comments in header.js for help on how to use these custom header/footer files.
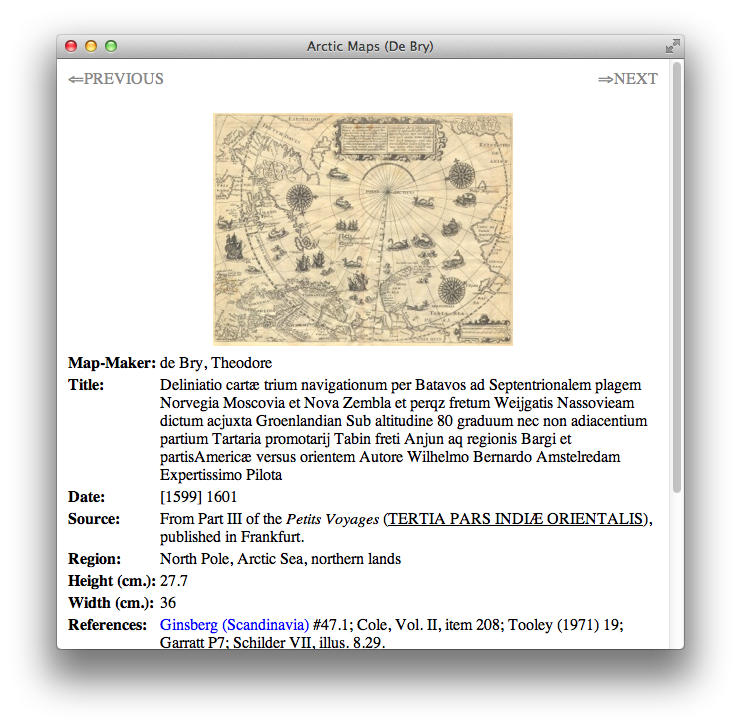
View a sample web page ... |
Producing a web site with Recollector is easy, as the program provides a wizard that steps you through the configuration choices for your report. To start the wizard, choose File > Generate Web Site (with Wizard) from Recollector's menu.
The wizard has four steps. You move from step to step with the Next button, or go back using the Back button. You can also click on the Step 1, Step 2, etc. tabs to jump to a different step.
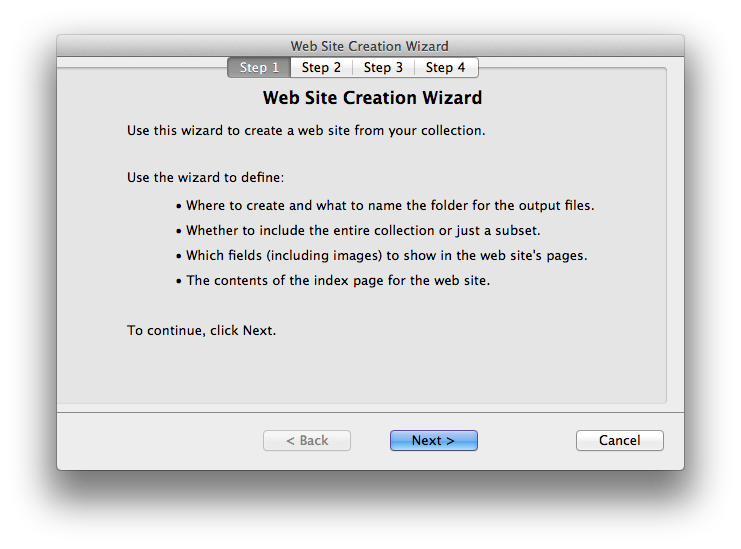
Step 1 - Introduction.
The first step of the wizard is simply an introduction, and shows you what choices you will be making. No choices are made at this first step.
View step 1 of the wizard ... |
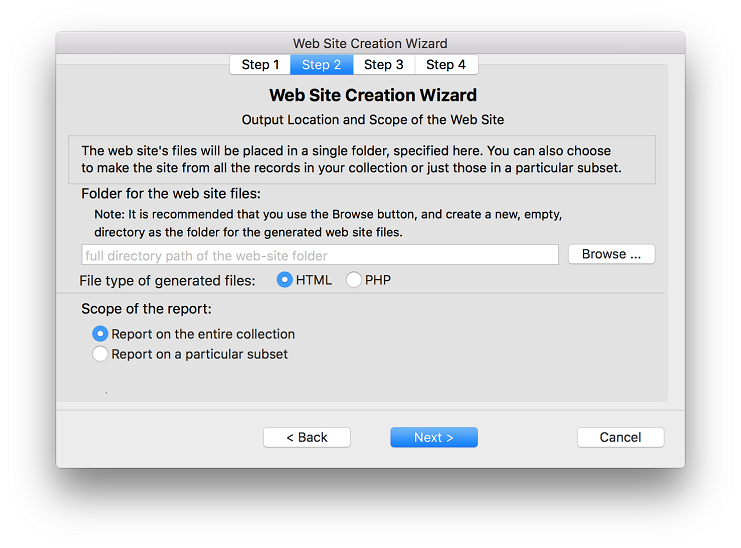
Step 2 - Output location and scope of the web site.
In this step of the wizard, make the following choices:
- The directory where the generated files should be placed. Click the Browse button to select a directory. You can also create a new, empty, directory (using the New Folder button in the Select parent directory panel). If you select an existing directory, and it is not empty, you will be warned that files may be overwritten.
- Whether the generated web site will consist of HTML pages or of PHP pages. Normally HTML pages will be created. However, if you plan to integrate your generated pages with an existing web site that is built using PHP, you may prefer to have Recollector generate PHP pages.
- Whether the report is to include the entire collection, or just the records in a particular subset.
- If a search subset is currently in effect, whether records not in the search subset should be omitted from the generated web site.
View step 2 of the wizard ... |
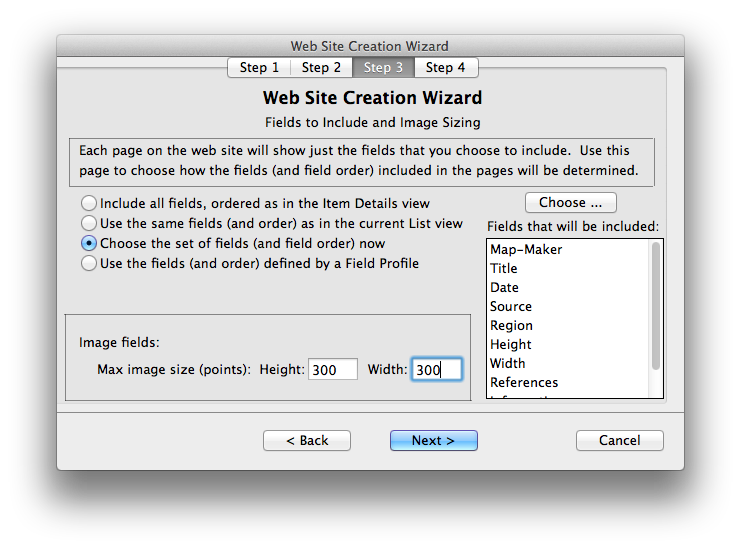
Step 3 - Fields to include; image handling.
In this step of the wizard, make the following choices:
- Which fields to include in the generated web pages, and in what order. You can start out by using all of the collection's fields, all of the fields in the List view, or all of the fields in a particular Field Profile. (If you plan to update the web site periodically, for example monthly, to document the state of your collection, it is a good idea to create a Field Profile to use for this purpose. Create a field profile named "web site" that defines the fields, and the field order, that you want for your web pages. Recollector will automatically select the "web site" profile as the initial choice for this step in the Wizard.)
You can adjust the initial choice of fields by selecting Choose the set of fields (and field order) now, and then clicking the Choose button (that will appear above the list of fields). This will bring up a panel in which you can adjust the set of fields included, and their order. - Specify the maximum width and height for the thumbnail images that will be shown on the web pages.
View step 3 of the wizard ... |
Step 4 - Index page.
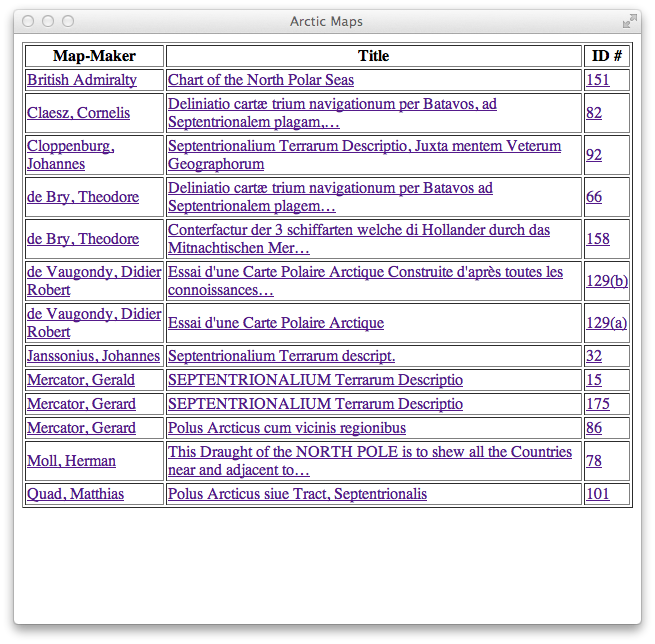
In this step of the wizard, choose up to three fields that will be displayed on the index page (index.html). The rows in the index page are sorted by the first of the selected fields. If you turn on the Desc. check box, then the rows will be sorted in descending order. The entries in the list are all hyperlinks, which take you directly to the page for the chosen item. If you do not want to have an index page, simply choose No Index for the First field.
You can choose to include one or more image fields for the any of the three index fields. If you do that, then the index will show a thumbnail, rather than text, in the cell of the index table. If a record has links to more than one image in an image field used in the index, the first two images found will be shown. (Additional images, if you have more than two for a single field of a given record, will not be shown in the index page, but will be shown on the details page for the record.) The thumbnail images on the index page behave, like texts, as hyperlinks to the details page for the given record. By default, the thumbnail images on the index page are scaled to a height of 100 pixels. You can change this to any value between 10 and 500.
Normally the index for the web site is generated as a single page (index.html or index.php). However, if you have a very large collection, loading a lengthy index page can be slow, particularly if you have included thumbnail images in the index. To avoid slowness, you can choose to split the index into multiple pages. The last choice on this step of the wizard lets you request that the index be split into pages, each of which has 10, 20, 50, 100 or 200 entries. A navigator bar, at the top and bottom of each index page, lets you move to adjacent or nearby pages.
View a sample Index page ... |
View step 4 of the wizard ... |

In the last step of the wizard (Step 4), a Finish button replaces the Next button. Click Finish to begin the generation of the web site. To be sure that you are happy with the configuration choices you made, the program asks you whether you would like to generate a test page. If you choose to generate a test page, the program will generate the sample page and display it in your web browser (usually Safari), and then will wait until you have had a chance to examine it. At that point you can request that the full run be started, or that you be taken back to the wizard, where you can make any fine-tuning adjustments to get the web page appearance you want.
You also have the option of saving the set of choices that you made in the wizard. These are saved as a named template which you can use, at some future time, to generate a web site with the same characteristics. To save your choices as a template, click the Save as a new template radiobutton, and type in a name for the template. When you click either Generate Output or Stay in Wizard, your wizard choices will be remembered in a template. See the section, below, on Web-Site Templates for more information.
View the "Do a test run?" query panel ... |

Web-Site Templates
You may want to periodically update your web site for your changing collection. When you use the report wizard to generate the web site, there are many choices that you make as you proceed through the wizard's steps. You may have to produce several test pages, tinkering with the wizard settings between test runs, to get just the look you want for your web site. Saving the wizard settings in a template means that if, let's say a month later, you want to generate an updated version of your web site, you will not have to remember all the detailed choices that you made the last time. You can simply ask to use the saved template, and the new version of your web site will have exactly the same characteristics as the previously generated web site.
When you save a template for a web site, the wizard will contain additional choices on the bottom of the first page. These choices let you choose a template (you can have multiple templates for a collection) and then click the Use Template button to immediately jump to the Web site is ready to be generated panel. All the wizard's steps will have been set from the choices saved in the template. You can still choose to Stay in Wizard (if you want to make adjustments to any of the choices specified by the template). If you do make some changes, when you are ready to generate the web site you will, if you want, be able to update the template or to make a new template, with a different name, from the current wizard choices. You can also delete a template, if you no longer want to save it.
Templates are per-collection. Since the web-site wizard utilizes collection-specific information (field names, subset names, profile names, etc.), a web-sites template cannot be used across collections. Each template is saved as part of the collection.