Editing data
To make changes to an existing record in your collection, click the Edit button at the top right of the collection window. You can also select Edit > Edit Record from Recollector's menu. This will bring up Recollector's data-editing screen, which is specifically formatted for the fields, and their data-types, that are defined for your collection.
| View the Edit Record window ... |
|
As can be seen in the image, above, different fields are presented with different kinds of text-editing boxes, the box style being chosen according to the data type of the field.
| Field data types and how they are shown in the data-editing window ... |
|
- Short text-editing boxes - used for fields whose data type is short text, currency, dimension, number , or date
- Single-line, full-width text-editing boxes - used for fields whose data type is one-line text or image/audio/video
- Multi-line, full-width text-editing boxes - used for fields of type long text
Additionally, some fields may have additional features:
- Short text or one-line text fields that are associated with a picklist display a down-arrow button. Click this button to select a value from a drop-down list. (See the color field in the example image, above.) See help on Picklists for information on how to set up a picklist for a short text or one-line text field.
- Image/audio/video fields will have a Browse and a Test button to the right of the text-entry box:
Click the Browse button to navigate to and select one or more image, audio or video files that you want to add into the field. The selected file name(s) will be appended to any existing files that are already present, with a semi-colon added to separate multiple image/audio/video file references. If your collection has an Image Directory defined, but the directory from which you select files is not the Image Directory, the program will ask you whether you want to copy the files to the Image Directory or access them from their original location. See help on the Image Directory for more information about using images with your collection.
You can also use drag-and-drop to add image/audio/video files. Select one or more files in a Finder window, then drag and drop them onto the image/audio/video field in the data-editing window. As with selecting files via the Browse button (described in the previous paragraph), the program may ask you whether to copy the selected files to the Image Directory or access them from their original location.
The Test button can be used to verify that the existing file references are valid, by bringing up, if possible, an image window (or a media playback window, for audio or video files), or, if a file cannot be shown (or played), an error message. Use this Test capability to make sure that your image/audio/video file references all work properly.
The order of the fields displayed in the data-editing window is the Item Details field order (unless it is customized, as described in the next section). In other words, the fields in the data-editing window match the order of fields as displayed in the Item Details window. To change this order, select Options > Item Details: Field Order from Recollector's menu, and use the dialog to move the fields into the desired order.
| Customize the fields and field order in the data-entry/editing window ... |
|
Normally the data-entry window includes all your collection’s fields. However, if you have many fields, and you are working on your collection in a way that requires you to access only a smaller number of each record’s fields, you can specify that the data-entry window only display the fields in a particular Field Profile (and in the order specified by that Field Profile). For example, if you have fields for valuation and date of valuation, and you want to update the valuations for some or all the items in your collection, you could set up a Field Profile that just included the fields needed to update the valuation information (one or two fields that clearly identify the object, plus the valuation field and the valuation date field). This prevents the data-entry window from being cluttered with many fields that you don’t need to look at or modify for purposes of updating the valuation information.
To do this, once a Field Profile exists, you will see a dropdown list, labeled Profile for fields to show, in the bottom panel of the editor window. Pick the Field Profile, by its name, from the dropdown list. After choosing a profile, the data-entry window will be redrawn, showing only the fields in the selected Field Profile. If the collection remains open, Recollector will remember this choice, so the next time the data-entry window is opened, it will continue to display just the fields from the chosen Field Profile. A warning, in the data-entry window's title bar, will remind you that you are only being shown a subset of the record's fields. To turn off the restricted field display, select Show all fields from the dropdown list. (Recollector does not retain the Field Profile restriction choice across invocations of the program. The next time you start up Recollector, when you initially open the data-entry window on a collection, it will always display all fields.) Note: When you are adding new records (rather than editing existing ones), the program will always display the ID # field, even if you are using a Field Profile and that profile does not include the collection’s ID # field. This is to ensure that you have access to the Assign next ‘ID #’ value capability when adding new records.
Note: You can also use this Field Profile capability to include all fields, but in a different order than that shown in the Item Details window. Simply create a Field Profile that includes all of your collection's fields, but in the order you desire for data-editing, and specify that Field Profile via the dropdown list in the editor window.
The data-editing window can be resized, or maximized, to provide more visibility to the full set of data fields. If the window is resized, Recollector remembers the size during your session, so the next time you edit records (or add new records), the window will open with the same size as it had when last opened.
You can use the <tab> key to move from field to field. <Shift>-tab (or <Ctrl>+<Shift>-tab for long text fields) moves you backwards through the fields.
Take advantage of long text fields:
Long text fields are one of Recollector's strengths. Unlike many cataloging programs, Recollector allows you to have unlimited length texts as part of your collection data. And Recollector's data-editing window includes several features to facilitate working with very long texts. These include:
| • Adjust the height of multi-line text-editing boxes ... |
|
Open the Preferences dialog (Recollector > Preferences from the menu). Select the Data Entry/Editing tab, and select a height from the popup list. Long-text data-editing boxes can be anywere from 2 to 20 lines high.
Note that this preference is global in scope, so changing it will affect the data-editing windows of all your collections. The change in line height will take effect as soon as you exit the
Preferences dialog.
| • Bring up a larger text-editing window for a single long-text field ... |
|
Open the context menu by right-button clicking (or <Ctrl>-clicking) on a multi-line or single-line text-entry box, and select the Edit field in larger window choice.
The editing window that comes up can be resized or maximized, to give you as much space as you need to edit the long text for the field. If you edit a single-line text in a large editing window, the text will be collapsed into a single line (by replace any carriage-return characters by single space characters) before being copied back into the single-line text box.
| • Break long texts into separate paragraphs ... |
|
When Recollector formats long texts for display or for reporting, the program breaks the text into separate paragraphs when it encounters a blank line, by itself, between two parts of the text. So, to introduce a paragraph break into your text, type two <Return> characters, which will introduce a separate, blank, line between the preceding and the following text.
The following images show an example of text with a paragraph break, in the text-editig window, and then what this same text looks like when displayed in the Item Details view.
In the Edit Record window:

In the Item Details display of this record:

Add text styles and hyperlinks to text fields
All three kinds of text fields (short-text, one-line text, and long-text) can include text styling (bold, italics, underlining, etc.). These fields can also include a variety of hyperlinks. Both of these capabilities - text styles and hyperlinks - are created by selecting text in the text-editing box and then using the context menu, which is invoked by right-button clicking (or <Ctrl>-clicking) on the text.
- To apply a text style, select the text you want to apply a style to, and then bring up the context menu. Choose one of the available text styles: Normal, Italic, Bold, Bolditalic, Underlined, Superscript, Large font. Note that styles cannot be combined: Any piece of text is one, and only one, of these styles or it is a hyperlink.
- To create a jump-to hyperlink, the ID # value of another record must be part of the text in the text field. Select that value, bring up the context menu, and choose Jump-to link.
| View an example of creating a jump-to hyperlink ... |
|

The ID # value (15) has been selected, and Jump-to link chosen from the context menu. (Only part of the context menu is shown in this screen capture):

The ID # value is now displayed as a hyperlink (blue and underlined):

The same field shown in the Item Details window. The hyperlink, if clicked on, will jump you to the record whose ID # is 15:
- To create one of the other kinds of hyperlinks (web-links, information links, media links, etc.), select the text you want to turn into a hyperlink, and then select Create/Edit Special Hyperlink from the context menu. Read the help on Special Hyperlinks for full information.
Save the new record
Click OK to save the new record. You can also click OK, go to previous record or OK, go to next record. These choices will save the just-edited record and then move backwards or forwards to the previous/next record, to allow you to continue editing.
Some other available data-editing features
| • Keep the editing window and the collection window synchronized ... |
|
Sometimes, when you are editing data, you might want to view the Item Details for the data record that you are editing. A checkbox at the bottom of the edit window, labeled Keep collection window synchronized, causes the collection window to stay in sync with the editing window. When you initially turn this checkbox on, the collection window will, if necessary, change the currently displayed record to be whichever record is open in the editing window. If you stay in the editing window, after finishing editing a record, by using the OK, go to previous record or the OK, go to next record button, the collection window will simultaneously switch to the same record now being shown in the editor. (Though the "stay in sync" behavior also works when the collection window is displaying its List or Image Gallerytab, this feature is primarily intended for use with the Item Details tab.)
Keeping the editing and collection windows synchronized is not always desirable. Sometimes there is good reason to have these two windows displaying different data records. For example, you might want to copy information from one data record to another. You can do this by selecting text from the Item Details of one record (using the
Item Details tab of the collection window), copy it (
Edit > Copy from the menu), and then switch to the edit window where you can position your cursor in a text-editing field and do an
Edit > Paste operation.
| • Let Recollector auto-complete typed-in values ... |
|
This auto-completion capability is automatically available for fields whose data-type is short text or one-line text. When you press the ESC key after having entered one or more characters into the text-entry box for the field, Recollector will search for matching values for this field in other records in the collection. If a single matching value is found, the text-entry box will be filled in with that matching value. If more than one matching value is found, a popup menu will let you choose the value you want. If no matching values are found, the program will beep and no change will be made in the text-entry box. The search for matching values is case-independent (so if you type in "smi" and some record has a value of "Smith, John" for this field, it will be found as an auto-completion possibility), but the auto-completed value will be entered exactly as it is found (case dependent). Auto-completion is not available for long text fields or for non-text fields (number, date, currency, image, etc.). It is also not available for the ID # field.
| • A shortcut for editing a group of related data records ... |
|
The Copy fields and Paste fields buttons, at the bottom right corner of the data-editing window, let you copy the value of a set of fields from the current record, so that they will be available to paste into a different record. If you click on the Copy fields button, a panel will be displayed showing all of the collection's fields:
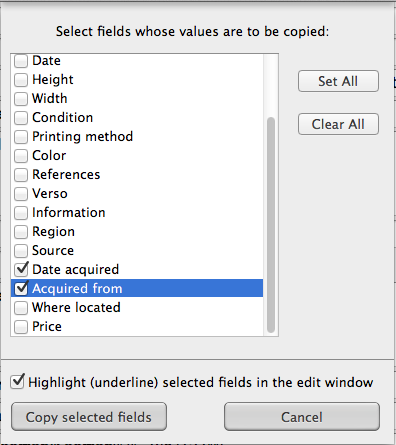
Select the fields that you want to copy. If you check the Highlight (underline) selected fields in the edit window choice, the data-editing window will provide a reminder of which fields are available for pasting, by underlining the field names of those fields.
Click Copy selected fields and the values for the selected fields will be copied to a special clipboard. The values on that clipboard are available when you are editing other records, or when you are adding new data records. Click the Paste fields button to automatically fill in whichever fields you had previously copied, This saves you time and possibly avoids typing errors.
| • Use a calendar helper to fill in date fields ... |
|
Next to every field whose data-type is date there is a calendar button. Click on this button to bring up a calendar helper. Select a date in the calendar by clicking on the desired day and then click the OK button. At that point, the calander helper will close and the selected date will be filled into the field's text-entry box using a date format based on a preference. To modify the preference, open the Preferences dialog (Recollector > Preferences from the menu), select the Data Entry/Editing tab, and select a date format from the popup list: Format for dates inserted by the calendar helper.
While using the calendar helper, use the left or right arrows at the upper-left corner to move to the previous/next month. The button between the two arrows will cause the calendar to jump to the month/year for today's date. To jump to a more distant month or year, click the Change month/year button, and then pick a different month and/or year. (The allowable year range is 1754 to 2100.) Today's date is shown with a blue background. The currently selected date (unless that date is today), is displayed with a dark gray background.
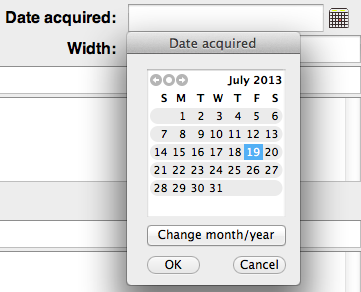
If the text-entry box for the
date field contains a value that represents a valid, fully-specified date (including a day, a month and a year), then, when the calendar helper is invoked, it will display a calendar for the month/year of the specified date, and the day-of-the-month for the specified date will be selected (shown with a dark gray background). Otherwise, if the text-entry box is empty (as in the
Date acquired field shown in the example in the above image), or if it contains an invalid date or an incomplete date (for example, "March, 1967", with no day-of-month specified), the calendar helper will initially display a calendar for today's month/year, with today's date selected.
| • Check for duplicate values in the ID # field ... |
|
Normally it is a good idea to have unique values for each record's ID # value. (This avoids ambiguity if you have a jump-to link to a record with a particular ID # value. If two or more records have the same ID # value, the program may jump to a different record than the one you expect.) By default, Recollector does not check to see if you are creating a duplicate ID # value when you add or edit a record. But to produce a warning when an ID # value is added or changed, and the specified value matches what is found in another record in the collection, you can open the Preferences dialog (choose Recollector > Preferences from Recollector's menu), select the Data Entry/Editing tab, and turn on the Warn on duplicate ID # values checkbox.
The warning will be displayed when, in the data-entry/editing window, you attempt to save the current record. Though usually desirable, ID # uniqueness is not required, so even if you are warned of a duplicate ID # value, the program will let you proceed to save the edited record, with the duplicate ID # value, if you so desire.
| • Check for valid numeric and date values ... |
|
Recollector does not normally check the values that you enter in the data-editing window. Since Recollector stores all its data internally as text, the program is happy to accept "xyz" as a value for a field whose data-type is "numeric." If you would prefer to have some validation done, you can open the Preferences dialog (choose Recollector > Preferences from Recollector's menu), select the Data Entry/Editing tab, and turn on the Warn on illegal numeric or date field data checkbox.
Validation is limited to numeric and date fields. Currency and dimension fields, despite usually holding numeric values, are not checked. The validation is fairly loose, especially for dates. Any value that the program can parse as a date, even if the value contains some non-date information, will be accepted.
If value checking is turned on, when you attempt to save the edited record (by clicking OK or OK, go to previous [or next] record), the program checks all numeric and date fields. If an invalid value is found, an error message is shown, and the data-editing window will not close until you fix the erroneous value, or turn off validation checking.
Note: Leaving a field blank (missing data) is always considered valid.
| • Use compact layout in the eding window ... |
|
Recollector normally lays out fields top-to-bottom, in Item Details order, in the editing window. If two short fields are adjacent, they may be placed side-by-side, but otherwise the layout always moves down to a new row in the editing window for each new field. This can result in inefficient use of screen space in the editing window, which forces you to scroll up or down to access all of the fields.
There is an alternative, compact, layout strategy that you can use. With compact layout Recollector tries to fill the screen space more fully. It does this by laying out long fields (data-types: one-line text, long text and image) in the left half of the window, and short fields (data-types: short text, number, date, currency, dimension) in the right half of the window. Fields are also shifted left-to-right (or vice-versa) in an attempt to equalize the length of the two sides. With compact layout you will generally find that all of your fields can be seen at one time, without scrolling, though you may have to maximize the editing window (by clicking the window's green zoom button) to get the desired effect.
Recollector only uses the compact layout strategy when: (1) The edit window is wide enough (at least 1000 points wide) and (2) You have requested compact layout in the Preferences dialog: Open the Preferences dialog (choose Recollector > Preferences from Recollector's menu), select the Data Entry/Editing tab, and turn on the Compact layout for wide (1000 pts or more) entry/editing windows checkbox. By default, this preference is turned off.
Related topics:
Adding new data records to your collection
Special hyperlinks
