Recollector User’s Guide
Using Picklists
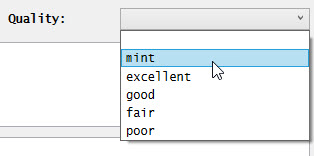
A picklist is a standard set of values used for a field in your collection database. For example, if you have a field named Quality for which each record should contain one of a standard set of quality terms (such as mint/excellent/good/fair/poor), then you could create a picklist consisting of these five values. You would then associate the picklist with the Quality field in your collection database. As a result, in the data-entry window, the Quality field would display as a text box with an associated drop-down list containing the terms from the picklist:
Notes:
· Picklists can only be associated with short text and one-line text fields.
· Consider auto-completion as an alternative to using picklists. Auto-completion lets you type the first few characters of a text field value and then press the ESC key. Recollector will see whether any existing values for this field in your collection begin with the same letters. If a match is found, Recollector will either fill in the rest of the value (if only one other existing value matches the starting letters you provided), or a popup menu will let you choose from among the existing values that start with the same letters. Auto-completion is provided by Recollector for all short and one-line text fields, except for the ID # field and any field associated with a picklist. Auto-completion is not provided for long text fields or for non-text fields. Auto-completion is easier to set up than a picklist, since there is no set-up required, but it only helps you enter a value when the desired value already exists in another record in your collection.
In addition to drop-down lists, one-value or two-value picklists can be represented in the editor by a checkbox control. This is described in a section at the end of this chapter.
In some cases, you may want to be able to select more than one value from a picklist. For example, for a collection of plants, you might want to record the months when the plant is in bloom. If you have a picklist containing the 12 months of the year (Jan/Feb…/Dec), and you are editing a record for a plant that blooms in March and April, you would want to pick both values from the picklist (Mar and Apr). This can be done by creating a multi-choice picklist. A multi-choice picklist is identical to a normal picklist, except that its name ends with a plus-sign character (+). You could create a picklist named Month+, and the plus-sign at the end of the picklist name tells Recollector to use a multi-choice selection panel, rather than a drop-down list, for any fields in the editor that are associated with this picklist. Multi-select picklists are described more fully later in this document.
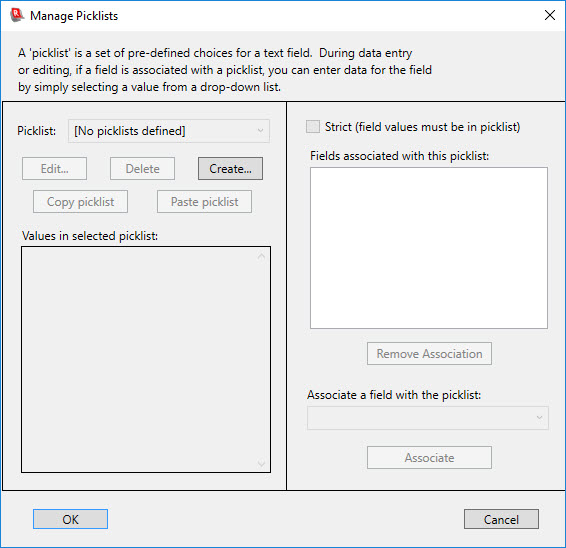
Picklists are created, modified, and deleted via the Manage Picklists dialog, which is invoked from the Options menu of the collection window. The first time you invoke the Manage Picklists dialog, the dialog will mostly be blank (since no picklists have yet been defined for the collection):
Click the Create button to create a picklist. The following dialog will be displayed:
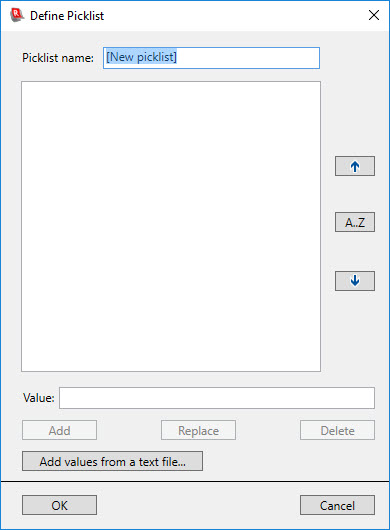
Enter a name for the picklist, and then enter values in the text-entry field at the bottom. Click Add to add each newly entered value to the list. You can change an existing value by selecting it from the list, typing in a revised text at the bottom, and clicking Replace. You can delete one or more values by selecting them from the list and clicking Delete.
You can add values to a picklist from an external file. Click the Add values from file button, and you will be prompted to pick the external file. Each line in the external file is taken to be a single value, and all the file’s values are added, with the exception that blank values and values that match an existing value in the picklist are skipped. The ability to add values to a picklist from a file is particularly useful when you have a picklist with many values, and you already have a file containing those values. So, for example, if you want to create a picklist with all the two-letter abbreviations for states, it is easier to load this list of values from an external file (which can be easily created from lists of state abbreviations found on the web) than it is to type in all the state abbreviations.
You can re-order the value list by selecting one or more values and using the arrow buttons, at the right, to move the selected values up or down. You can also use drag-and-drop to rearrange items in the list. You can also alphabetize the current elements in the list by clicking on the A…Z button. When the picklist values have been entered, click OK to return to the Manage Picklists dialog. Here is what the Manage Picklist dialog would look like after entering the Quality picklist described at the top of this page:

To associate a field with a picklist, make sure that the desired picklist is selected in the drop-down list at the upper left. Then select the desired field from the drop-down list at the lower right and click the Associate button. The following shows what the Manage Picklists dialog looks like after selecting Quality from the drop-down list at the lower right and clicking Associate:

In this example the field and the picklist happen to have the same name (Quality). This is not required; picklist names and field names are independent, and you can associate multiple fields with the same picklist. So, you might, for example, create a picklist with the values “Yes”, “No” and “Maybe”, and if you have several fields whose content is expected to be Yes, No, or Maybe, you could associate this picklist with all those fields.
The Strict checkbox determines whether, during data-entry, a field is required to exactly match one of the values on the associated picklist (or blank: an empty, blank, value is always allowed for any field). If you choose strict behavior, only values that appear on the picklist are allowed, thereby forcing you to use a “controlled vocabulary” for the associated field. By default, picklists are not strict, and in the data-entry window you will be allowed to type any value into a short text or one-line text field, whether or not it is in the field’s associated picklist.
Other buttons on the dialog allow you edit the values (or name) of an existing picklist, delete a picklist, or remove the association between a field and a picklist. (Since a field can only be associated with one picklist, if you associate a field with one picklist, and that field had previously been associated with a different picklist, the program will automatically remove the prior association.)
If you have set up multiple collections, and you have created a picklist in one collection, which you would also like to use in the second collection, you can use the Copy picklist and Paste picklist buttons. Note that these copy and paste operations do not utilize the Windows clipboard but are handled entirely within the program. Therefore, the Copy and Paste operations must be done within a single session of Recollector, copying the picklist from one collection, switching focus to the second collection, and then opening the Picklist Manager dialog in the second collection and pasting the picklist. This may seem a bit cumbersome, but if you have created an elaborate picklist with many entries, it is still much easier, and more accurate, to use this built-in copy and paste capability than re-creating the long picklist from scratch for the second collection.
Auto-populating
picklists
If you create a picklist with a single value, and that value is [AUTO] (the word “AUTO” may be in upper, lower, or mixed case, but it must be enclosed within square brackets, as shown), then Recollector will automatically populate the values in the picklist by the actual values found for the associated field in the existing records of the collection. These auto-populating picklists are always treated as non-strict, allowing you to enter new values. Any new value that you enter will get added to the auto-populated picklist for the next time you add or edit a record to the collection. You only need one such auto-populating picklist definition for a collection, since this picklist – and the editor behavior that it provides – can be associated with multiple fields. In this case, the displayed dropdown list for each field will show the existing values for just that field.
An auto-populating picklist is very much like the auto-completion capability described in the note at the beginning of this chapter. Both capabilities provide a way to easily select a new value by choosing from the existing values for a field that occur in other records in the collection.
Creating a checkbox
with a picklist
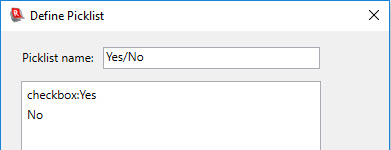
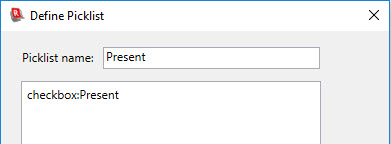
If you have a field that is best represented in the editor by a checkbox – in other words, the value of the field is either on or off – then you can create a special picklist which Recollector will recognize as instructing the program to display the field in the editor as a checkbox. To do this, create a picklist with either one value or two values, and precede the first value by the word “checkbox” followed by a colon. The following shows the values from a two-item picklist that has been set up to provide a checkbox in the editor:
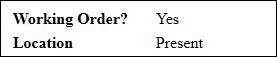
In the editor, a field (Working Order? in this example) that uses this picklist will be represented by a checkbox that looks like the following:
![]()
A one-item picklist can also be used to generate a checkbox control in the editor:
In the editor, a field using a one-item checkbox will look the same as the two-item case:
![]()
The difference between a one-item and two-item picklist is reflected in the data value that the field will contain when the checkbox is in the unchecked state. With a one-item picklist, a field represented by an unchecked checkbox will have an empty/missing value, whereas with a two-item picklist the field will have the second of the two values and will therefore never have an empty/missing value. Note that the checkbox is only shown in the editor. In the Item Details view the field will be shown like any other field: a field label followed by a value (or not shown at all if the field’s value is empty/missing):
Similarly, the field will be shown as a simple text value in the List View or in Image Gallery labels; only in the editor will it be shown as a checkbox.
The choice of whether a picklist is strict or not strict is ignored for checkbox picklists. The behavior is always strict, since you cannot enter alternate values.
Multi-select
picklists
As described earlier in this section, a picklist whose name ends with a plus-sign (+) character will cause associated fields to be handled in the editor using a multi-select picklist dialog. A multi-select picklist is shown in the editor with a check-box button to the right of the field’s text-entry box. The text-entry box for the field cannot be directly typed into; its content must be specified via the multi-select dialog which is brought up by clicking on the button:
![]()
Clicking on the check-box button brings up the multi-select panel:
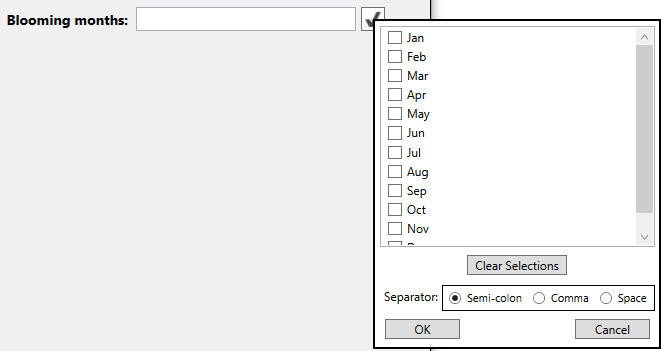
Click on one or more of the check boxes to select the values that you want to include in the field. If you choose multiple values, they will all be entered into the field, separated by the specified separator. If Mar and Apr are checked, and semi-colon is selected as the separator, the field will look like this when you click OK:
![]()
If a field associated with a multi-select picklist already has values in it, when you click the button and bring up the multi-select panel, it will be opened with its check boxes reflecting the current values. If some of your individual picklist values contain spaces (or commas), the program may not correctly reflect the currently selected values, particularly if you previously used space (or comma) as the separator character. It is recommended that you choose, as a separator character, a character that does not appear in any of the individual picklist values. Since semi-colons are unlikely to be used in picklist values, semi-colon is the default separator recommended by the dialog.
To uncheck all the check boxes, click the Clear Selections button.
Be aware that if a field is associated with a multi-select picklist, the contents of the text box in the editor for this field can only be modified through the multi-select panel. You cannot directly type into, or select characters and delete, the contents of the text box in the editor. You must click on the check-box button to bring up the multi-select panel in order to make changes to the field’s contents. Because of this behavior, multi-select picklists are always created as ‘strict’ and should be kept so. If you turn off the Strict setting for a picklist whose name ends with a plus-sign (+), it will behave like a single-select picklist.
You may find that you want to use the same picklist in single-select mode for one field and in multi-select mode for a different field. The example shown above used multi-select for the Blooming months field, since a particular flower might have multiple months of bloom. But the same collection might have a field that specifies the earliest planting month, and for this field a single-select picklist (with the 12 month values) would be appropriate. You cannot use the same picklist for both single-select and multi-select field associations. To handle this case, create the initial picklist, and give it a name that does not end in a plus-sign (+) character. This is the picklist to use for single-selection situations. Then use the Copy picklist button, followed by the Paste picklist button, to make a second picklist, with the same set of values in it. But add a plus-sign (+) character at the end of the name of the new picklist. This, then, becomes the picklist to use in multi-select situations. By using the Copy picklist and Paste picklist functionality, you will only have to specify the set of individual values once.
Back to: Using the Collection
Back to: Recollector - Home Page