Installing and Running the M.R.P. Collection
Manager
on a USB Thumb Drive
The M.R.P. Collection Manager can be installed onto a USB thumb drive and run directly from the thumb drive, without any separate installation required to the hard disk of the computer. With this capability you do not need to carry your computer with you to transport your collection information - you just carry around the thumb drive and plug it into the USB port on any computer that is running MS/Windows.
This page describes how to install the M.R.P. Collection Manager to a thumb drive (also sometimes referred to as a "flash drive"), and how to make sure that your collection data (and images) are also on the thumb drive, so that the program and the data travel together when you move the thumb drive from one computer to another.
Downloading the M.R.P. Collection Manager and installing it onto a USB thumb drive
It is best to start with a new, empty thumb drive, rather than to install onto a thumb drive that already contains other data. Primarily, this is to avoid the unlikely case of having the Collection Manager installation overwrite some same-named files already on the thumb drive. Once you have completed the installation, as long as there is adequate free space available on the thumb drive, you can safely use the thumb drive to store files other than those related to the Collection Manager software or your collection data. But for the initial installation of the software, we recommend that you start with a new, empty thumb drive.
Thumb drives come in a variety of sizes. How much space you will need depends on the size of your collection, and, in particular, on the number and size of the image files that you expect to have. The program itself is relatively tiny: 15MB. A 1GB thumb drive will typically be large enough for most collections with up to 1,000 images in JPG format. But larger thumb drives (2GB, 4GB, 8GB or larger) are readily available and quite inexpensive, so it is probably best to start with a thumb drive that has enough capacity so that you can avoid any worry about running out of space.
Once you have plugged a new, empty thumb drive into one of your computer's USB ports, note which drive letter Windows has assigned to the thumb dirve. At this point the process of installing the M.R.P. Collection Manager is basically the same as installing to a hard disk: Go to the download section on the M.R.P. Collection Manager page and click the Download M.R.P. Collection Manager button. This download is an executable program (CollectionManagerSetup.exe), which you run to complete the installation. The third step of the installation wizard (after agreeing to the licensing terms) is where you are asked to choose an installation location. At this point you should replace the default location with the following four-character location specification:
<device_letter>:\.
For example:
E:\.
where the first letter (shown as "E" in this example) is the drive letter (either upper-case or lower-case) that your computer has assigned to your USB drive. If you don't know what letter Windows assigned, you may have to click on My Computer - on the desktop or in the control panel, depending upon the version of Windows you are running - to see which drive letter corresponds to your thumb drive. Be sure to specify the installation location with exactly four characters, as shown above: a drive letter, a colon, a backslash, and a period. Once you have specified this installation location, just continue through the installation wizard, accepting all the defaults.
Running the M.R.P. Collection Manager from your thumb drive
When you install the M.R.P. Collection Manager to a thumb drive, no desktop icon is created for starting the program. Instead, there is a batch file, Run_Collection_Manager.bat, at the top level of the the thumb drive. You can run the Collection Manager by double-clicking on this batch file. In addition, each time you insert the thumb drive into a computer's USB port, the Windows system will start up an auto-run menu (Windows XP or later). On Windows XP or Windows Vista, the auto-run menu will look like this:
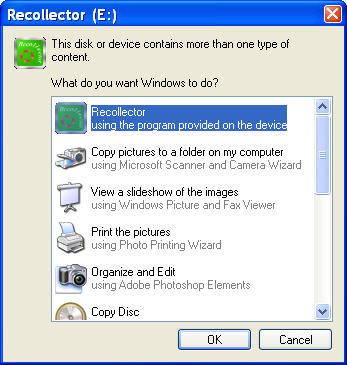
The first item on the menu, pre-selected, is the M.R.P. Collection Manager. So just click the OK button to start up the program.
On Windows 7 the auto-run menu will look like this:

Click on the Open folder to view files option to see the files on the thumb drive. One of those files will be Run_Collection_Manager.bat:

Double-click the Run_Collection_Manager.bat file to start up the M.R.P. Collection Manager. (Note: Depending upon your Windows 7 settings, the file name may not include the .bat extension; it may be displayed simply as Run_Collection_Manager.)
Note: If you are running a version of Windows earlier than XP, you can access the Run_Collection_Manager.bat file by double-clicking the My Computer desktop icon and then double-clicking the icon for the thumb drive. This will bring up a window showing the files at the top level directory of the thumb drive, and you will see there Run_Collection_Manager.bat (or Run_Collection_Manager, without the .bat extension) which you can double-click to start the program.
After initial installation, the M.R.P. Collection Manager will be running on your thumb drive in demo mode (maximum of 25 records in any single collection). If you do not already have a registration key, you can purchase a registration key at the M.R.P. Collection Manager web page and install it via the About the M.R.P. Collection Manager / Product Registration menu choice on the Help menu of the Collection window, or via the Register (remove demo mode restrictions) button on the Collection Manager Control Window.
Creating a collection database on the thumb drive
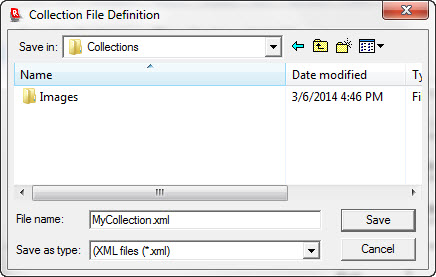
Creating a new collection database on the thumb drive is no different from creating a collection database on your hard disk. During the setup steps of creating a new collection, when you are prompted for where to store the collection file, simply navigate to the thumb drive and choose where you want the collection file to reside. During the installation, an empty folder named Collections was created on the thumb drive. We recommend that you use this Collections folder to store your collection file:
 |
| ↓ |
 |
Specifying an Image Directory for your collection's images
Note that there is also a folder named Images that is a sub-folder of Collections. When your collection is on a thumb drive, all image files must be stored in an Image Directory that is a sub-folder of wherever your collection file is located. The sub-folder does not need to be named Images, but we have created this folder as a suggestion and as a reminder that you must take advantage of the Image Directory approach to storing your collection's images, if you want your collection to function properly when the thumb drive is moved from one computer to another.
When you specify the Image Directory for your collection, specify its simple name (e.g. Images). Do not specify a full pathname (e.g. E:\Collections\Images). In other words, when you use the Specify Image Directory dialog, just enusre that the image file folder's name (without its full path) is given; do not use the Browse button. If you used the Collections folder to store your collection file, as recommended earlier in this write-up, then the Specify Image Directory dialog will appear as follows, with the already-created Images directory suggested as the location for your image directory. You simply need to click OK to accept this choice.

When you specify a simple directory name, rather than a full pathname, for the Image Directory, the program is able to locate your collection's images even when the drive letter changes. If a full pathname is used (e.g. E:\Collections\Images), the program will not be able to find your images if the thumb drive letter changes (as it frequently will do when you plug the thumb drive into a different computer).
If the directory name you specify does not already exist, the Collection Manager will inform you, but will let you proceed with the creation of your new collection. In this case you should create the appropriate directory later (using, for example, Windows Explorer), and then move image files into this directory so that they will be present when you begin to add records, along with their image links, to your collection.
Installing the M.R.P. Collection Manager to both your hard disk and a thumb drive
The M.R.P. Collection Manager license agreement allows you to install the software to both a hard disk and a thumb drive. Simply perform the download and installation twice, once to your computer's hard drive and once to a thumb drive. When you purchase a registration key, the same key should be entered in both copies of the software. If you previously installed the software to your hard disk, and now want to install to a thumb drive, you can use the registration key that you received via email (when you originally purchased it) to unlock the new copy of the software that you install to your thumb drive. If you do not still have the email containing your registration key, open the About the M.R.P. Collection Manager dialog from the Help menu on the previously installed and registered copy of the program. Your license key will be displayed there. (If it is not displayed, you are using an older [prior to 1.1.38] version of the program. You should first upgrade th version of the program on your hard disk - which will allow you to see your license key - and then proceed with the installation of the thumb-drive copy.)
Note: If you are currently running an older version of the M.R.P. Collection Manager on your hard disk, we recommend that when you download and install the program to a thumb drive, that you also download and re-install the software on your hard disk. This will guarantee that your two copies of the software are in sync and compatible with one another.
Moving your already-created collection from your hard disk to your thumb drive
If you have already been using the M.R.P. Collection Manager on your computer's hard disk, and you now want to take advantage of the thumb drive option, you will probably want to copy your collection from the hard disk to the thumb drive. Making a copy of your collection can be simply done using the backup and restore capabilities of the software. First, run the hard disk copy of the M.R.P. Collection Manager. With the collection window open, choose Backup from the File menu. Select a location on your hard disk to temporarily store the backup copy of your collection. This can simply be the top-level folder of your hard drive (e.g. C:\) or some other folder on your hard drive suitable for holding temporary data (e.g. C:\Windows\temp). Also, select the Back up the collection file and all the image files radiobutton.
Depending upon the size of your collection (and, in particular, the number and size of your image files), the backup may take a while to complete. A dialog will show the progress of the backup. When completed, the backup will have created a new folder in the specified location. The name of that new folder reflects the name of the collection and the date and time of the backup (e.g.: MyCollection_03JAN2011_13_12).
Next, exit from the hard-drive copy of the M.R.P. Collection Manager and start up the thumb drive copy of the program. (See the instructions, earlier on this page, on how to start the thumb drive copy of the Collection Manager.) Go to the Collection Manager Control Window. (If the Control Window is not opened automatically at start-up, you can open it from the Windows menu of the collection window.) In the Control Window, click the Restore or Copy a Collection from Backup button. In the file dialog that comes up next, navigate to the folder created in the previous step (e.g. C:\Windows\temp\MyCollection_03JAN2011_13_12), and, within that folder, select the XML file (e.g. MyCollection.xml). In the subsequent window, choose Copy. In the subsequent file dialog, navigate to the Collections folder on the thumb drive (e.g. E:\Collections). You can leave the filename as suggested, or, if you wish, you can change the name of the file, but be sure to leave the filename extension as .xml. The restore may take a while, depending primarily on how many and how large your image files are. A dialog will display the restore's progress. When the dialog completes, a message will indicate that the restore is complete and that the restored collection has been set as the current collection. Click Yes and the imported collection will be displayed. You now have a fully functioning copy of your collection on the thumb drive.
Important note: The backup/restore process just described, for moving your collection from your hard disk to a thumb drive, causes, as a side effect, all of the collection's images to be gathered into a single directory on the destination thumb drive. This is true even if the original hard-disk copy of your collection has its images spread around in many different places. Both copies of your collection, on the hard disk (with its images possibly spread about in different directories) and on the thumb drive (with all its images gathered into a single directory), will work identically, but the relative location of image files will usually be different in the two installations. Also, once you have two copies of your collection, be aware that changes made to one copy will not automatically be propagated to the other. After making changes you may want to repeat the backup/restore process to again get your copies in sync. Alternatively, you may find it easier to simply migrate your use of the collection entirely to the thumb drive, since then you will have only one copy to worry about.
Back to the M.R.P. Collection Manager Home Page